Hello World bootloader in assembly
Web development can sometimes be boring. Let’s do something else. Today we’ll write a bootloader that displays “Hello, World!”. In assembly language. Just for fun.
Note: for maximum fun, try MOS 6502 AL on Commodore 64. It is simple, with only a few 8 bits registers, has a well documented memory layout and with amazing capabilities for a ludicrous 64kB RAM.
Caveat emptor
- This blog post and the code is largely inspired from OS Development Series
- This is not my primary field of expertise so feel to correct me and don’t take the facts listed here at face value
Vocabulary
- Assembly language (AL): “low-level programming language for a computer”
- Assembler : “a program which creates object code by translating combinations of mnemonics and syntax for operations and addressing modes into their numerical equivalents”
“Calling the language assembler might be considered potentially confusing and ambiguous, since this is also the name of the utility program that translates assembly language statements into machine code. However, this usage has been common among professionals and in the literature for decades.” — Wikipedia
Toolchain
- GNU/Linux Debian Jessie (testing)
- nasm 2.11.05
- bochs 2.6
- HEX editor (optional)
- vim or any other decent editor
Any distro will do the trick. Bochs might not be working on recent OSX versions. Didn’t check on S Windows.
Bootloader
- Stored in the Master Boot Record (MBR), on the first sector of the disk
- Size is exactly 1 sector, or 512 bytes
- Ends with a signature of
0x55and0xaaat bytes 511 and 512 - Loaded by the BIOS POST interrupt
0x19at address0x7c00 - Runs in 16 bits mode
Keep in mind that we have no filesystem and no operating system. No DOS, no Windows, no Linux and none of the associated interrupts, libraries and routines.
16 bits real mode
Real mode is an operating mode of all x86-compatible CPUs. The x86 family is backward compatible with the old DOS systems. Because they were 16 bits, all x86 compatible computers boot into 16 bits mode.
- Uses the native segment:offset memory model
- Limited to 1 MB of memory
- Limited to the 16 bits registers
- No virtual memory
- No memory protection
- No multitasking
- No code privilege
Notice that because of the segment:offset model, a given physical address can be represented by many segment:offset combinations. They overlap.
Show me the code
See this gist. It’s actually pretty simple. Things get crazy when you start to handle a filesystem and want to load a program in memory, like in a dual-stage bootloader, but there’s nothing that complex here.
org 0x7c00
The org directive defines where the program expects to be loaded into memory. Not where it is actually loaded - that is controlled by whoever does the loading, here the BIOS POST [SO ref].
Its sole function is to specify one offset which is added to all internal address references within the section nasm doc.
You can try to modify the address, for instance to 0x7c01. The program will/may still work but the message will then be truncated.
There is no print function or anything like that. You practically have to point to the first character in the message buffer, load it in a register, print it, then move the pointer to the next character until you reach end of buffer (represented by 0). So we can consider ourselves lucky to have the lodsb (Load String Byte) instruction:
“LODSB transfers the byte pointed to by DS:SI into AL and increments or decrements SI (depending on the state of the Direction Flag) to point to the next byte of the string.”
So it does this:
AL <- DS:SI
SI++
Given our message:
msg: db "Hello, World!", 0
We can set SI to point to the first character:
mov si, msg ; SI points to message
To print a character at the cursor position, we use service 0x0e (Write Character in Teletype TTY Mode) of BIOS interrupt 0x10 (Video and Screen Services).
mov     ah, 0x0e                ; print char service
int     0x10                    ; print char
The character is loaded in AL by lodsb, while SI is incremented for us.
To detect the end of the string, we look for a 0. The obvious way is to do cmp al, 0 but a common idiom is to use or al, al. It’s faster or 1 bit shorter, I’m not sure. In a similar fashion, mov ax, 0 is often replaced by xor ax, ax. In any case, after comparing AL to 0, whether with cmp or or, we test the zero-flag to check if we’ve reached our 0. If it’s the case, we jump to the halt label. Otherwise, the character is printed and we jump back to the loop.
.loop   lodsb                   ; AL <- [DS:SI] && SI++
        or      al, al          ; end of string?
        jz      halt
        int     0x10            ; print char
        jmp     .loop           ; next char
No, there is no if-then-else construct. Conditional jumps (like jz) and unconditional jumps (jmp) are part the game.
When we’re done, we simply halt:
halt: hlt
Remember that our bootloader must be exactly 512 bytes, and that the two last bytes must be 0x55 and 0xaa. We need to fill the space in between, using some handy directives:
$reprensents the address of the current line$$is the address of the first instruction- So
510 - ($ - $$)gives us the number of bytes we need for padding timesrepeats the given line or instruction
Combining all of that together, we have our padding:
times 510 - ($-$$) db 0
We still need to add our 2 bytes signature:
dw 0xaa55
Because the x86 processor family is little endian, the least significant byte (0x55) is stored in the smallest address. You might argue that two consecutive db would be more explicit and I’d agree.
Compile and check
Your linux usually ships with as but its syntax is both backward and cluttered. I opted for nasm, which is also available on OSX and Windows.
$ nasm -f bin hello-boot.asm -o hello-boot.bin
You want a “pure” binary file, hence the -f bin flag.
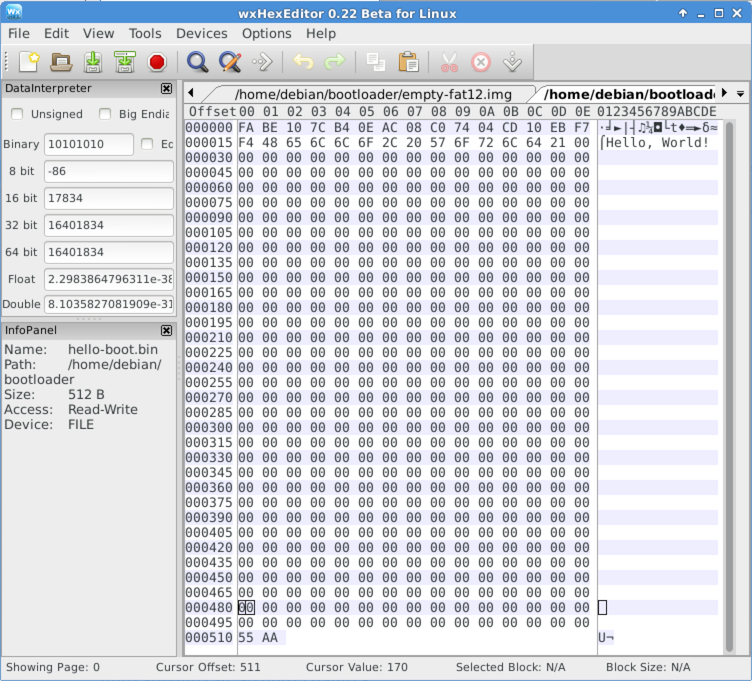
Make sure the generated file is exactly 512 bytes (ls -l will do). If you open it with an HEX editor, you will be able to see the hello message, the padding and the signature. Notice 0x55 and 0xAA are is the expected order.
BOCHS
You probably don’t want to install our little bootloader directly on your hard drive. A portable x86 PC emulator like BOCHS is much more convient. For our exercice, quemu should do fine too. Feel free to use whichever you are comfortable with.
apt-get install bochs bochs-x
You might want to install bochs-wx too. For some reason, I couldn’t display the registers with the info command without the GUI.
Create a configuration file. We will simulate a 1.44Mb floppy disk.
debian@debian:~/$ cat bochsrc.txt
megs: 32
romimage: file=/usr/share/bochs/BIOS-bochs-latest, address=0xfffe0000
vgaromimage: file=/usr/share/bochs/VGABIOS-lgpl-latest
floppya: 1_44=hello-boot.bin, status=inserted
boot: a
log: bochsout.txt
mouse: enabled=0
display_library: x, options="gui_debug"
Remarks:
- The last line is for GUI debugging and is optional
- The location of romimage and vgaromimage may vary depending on your distro and even on the program version
- The nasty
addressfor the BIOS image may change from version to version
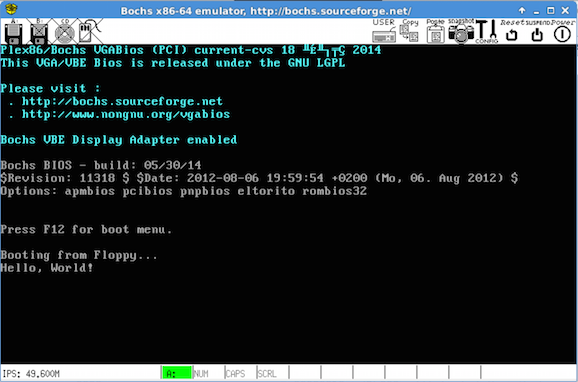
Launch bochs. Press c then enter to continue (why does it stop in the first place?). Witness the result :-)
Running on real hardware
Emulation is great for development and testing but it’s not the real thing. Let’s run our toy for real. One “convenient” way to do so is to install it on a real floppy disk. It is no surprise that my MBP has no floppy drive (it doesn’t even have a DVD/BR drive), but I aslo have a desktop PC running Windows for gaming. But first, I must dig up a floppy drive, a disk and some cable. I know I can call @chewie301 if need be.
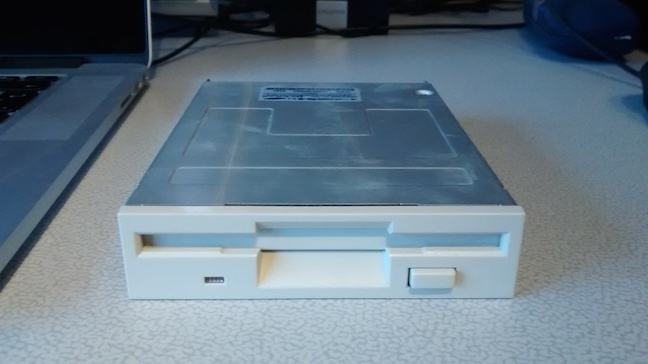
Reader aged less than 25 may have never seen that device. Some assembly required. Find the FDD socket on your motherboard. Do not forget to adjust your BIOS settings to boot from floppy.
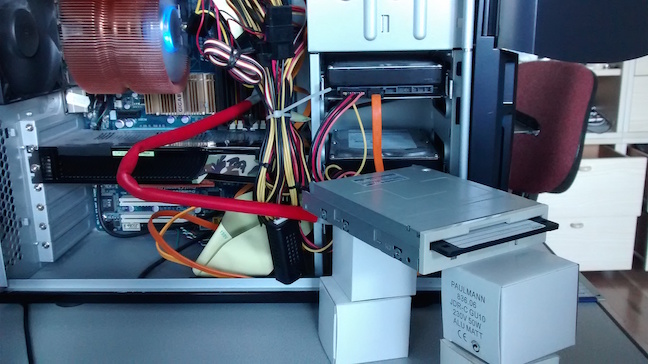
That hazardous assembly will do. Make sure you don’t block the rotating part under the drive if you don’t mount it in a proper rack. I have cygwin installed, and although I can’t manage to mount to floppy drive, it is actually accessible. Copy the bootloader to the boot sector:
$ dd if=hello-boot.bin of=/dev/fd0 count=1 bs=512
1+0 records in
1+0 records out
512 bytes (512 B) copied, 0.0617447 s, 8.3 kB/s
You should hear a satisfying mechanical sound as the heads and the platter move while the payload is copied.
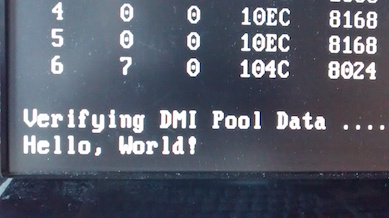
Reboot.
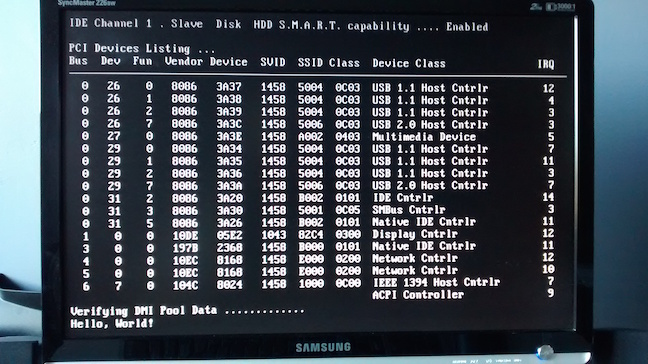
The drive remains spinning with the light on, certainly because of the harsh halt command at the end (TODO: improve).